The exterior paint that peels in two years wasn’t bad paint. In almost every case, something went wrong before the first brushstroke.
Wood with moisture trapped underneath. Old paint that wasn’t fully removed. Cracks that were caulked without priming first. The new coat went on, looked fine for a season, then started failing at every weak point the prep left behind.
Exterior paint fails from underneath, not from the surface. What shows up as peeling at the top was a preparation problem at the bottom.
Why exterior wood is different
Interior walls are relatively stable. They don’t swing through temperature extremes, they don’t take direct rain, and whatever adhesion issues develop show up slowly over years.
Exterior wood moves constantly. It expands in heat and contracts in cold, absorbs moisture from rain and releases it in sun. A coat of paint on top of that movement has to flex and breathe. When the prep isn’t right, the bond breaks at the first temperature swing or wet season.
Wood rot is the condition that disqualifies paint entirely. You can’t paint over rot. Soft, spongy, or visibly damaged wood needs to be repaired or replaced before any primer or paint goes on, because rot continues under paint. It’s slower, but it continues. Major structural rot means replacing boards; minor surface rot can be treated with an epoxy wood consolidant and filler, then primed and painted.
Work with the house you have, including the parts you can’t change.
Prep in the right order
The sequence matters as much as the individual steps.
Start with a full inspection. Run your hand along every board. Press on any area that looks soft or discolored. Check window and door surrounds, sills, and anywhere two boards meet. Mark everything that needs work before you touch the scraper.
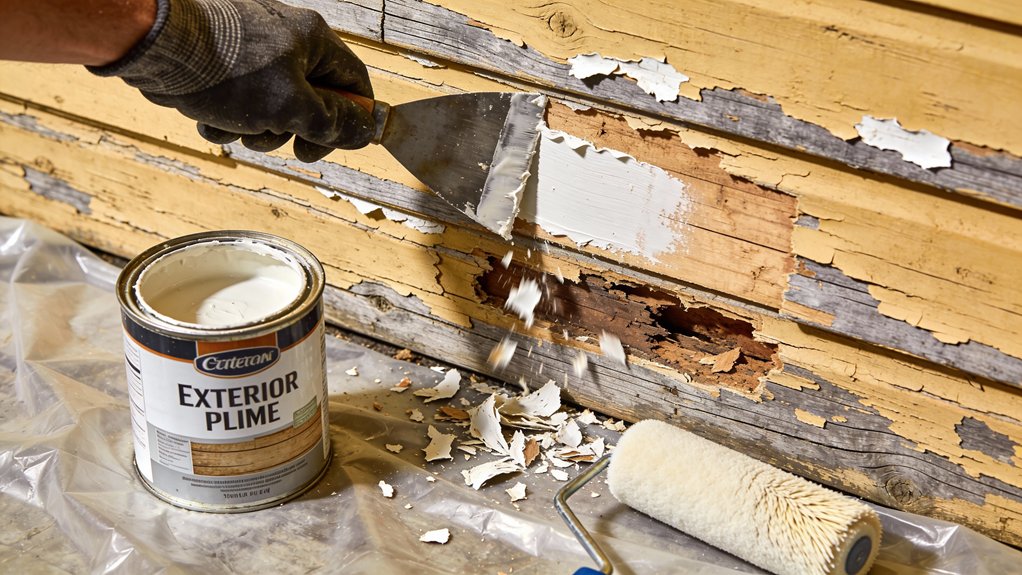
Remove loose and flaking paint before anything else. Paint scraper, wire brush, or pressure washer depending on how much is coming off. The goal is to get down to paint that’s firmly bonded to the wood. Feather the edges between bare wood and existing paint with medium-grit sandpaper so there’s no hard ledge for water to catch under later.
A section of bare wood going back to paint holding well is fine. A section where the bond is weak all the way to the last owner’s repaint is not. Get it off.
Clean the surface before priming. Dust, pollen, and algae from a north-facing wall all compromise adhesion. Mild detergent and a rinse with a hose, or a light pressure wash, then wait for the wood to dry completely. Painting over damp wood is one of the reliable ways to trap moisture and fail in year one.
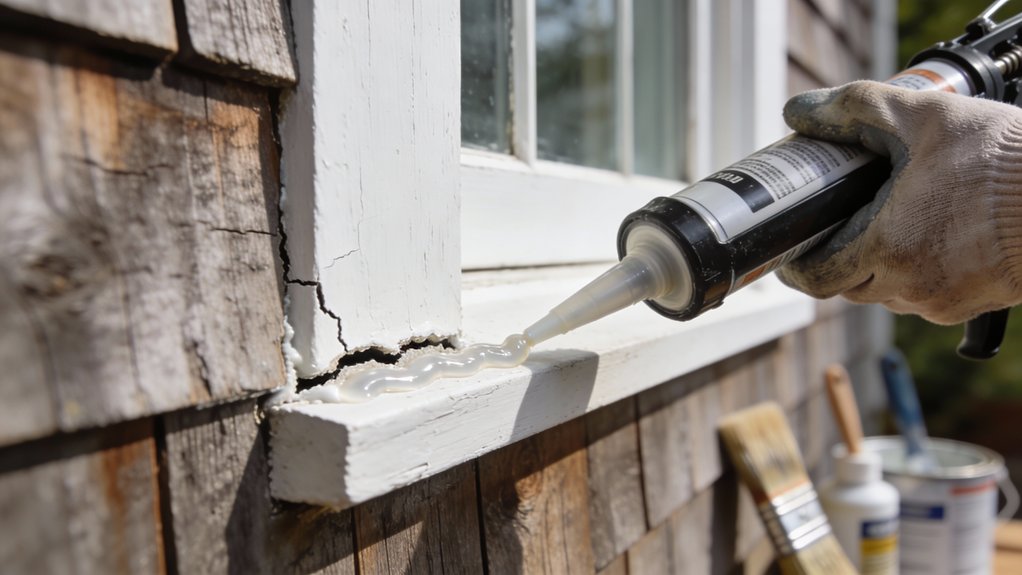
The caulk step people get wrong
Caulking fills gaps at joints, along trim, and wherever two surfaces meet. It’s the barrier that keeps water out of the seams.
The most common mistake: caulking last, over fresh paint, with no prime underneath.
Caulk seals better against primed wood than against bare or painted surfaces. Apply it after priming and before the topcoat. That way the primer has the bare wood adhesion, the caulk fills the joint, and the topcoat covers everything uniformly.
Use exterior-grade acrylic caulk rated for outdoor use. It stays flexible through temperature changes rather than cracking. Smooth the bead with a wet finger immediately; once it skins over you can’t work it without making a mess.
Wait the full tack time on the caulk before painting over it. That time is on the label. Painting over uncured caulk traps solvents and the caulk can shrink.
Good design is mostly decisions about light, color, material and proportion, not money.
Primer and what it actually does
Primer serves two functions that topcoat paint can’t replace.
The first is adhesion. Bare wood is porous and absorbs unevenly. Primer penetrates the surface and creates a uniform base that topcoat paint grips.
The second is sealing. Exterior primer blocks tannins from bleeding wood from coming through the topcoat, prevents moisture from wicking in from the bare-wood side, and covers stains that topcoat would let show.
Spot-priming bare patches is not the same as priming the whole surface. If you’re repainting a wall where large sections of old paint came off, prime the entire surface for uniform adhesion and finish.
Let primer dry fully before paint. Most products specify at least 24 hours; some faster-drying formulas go sooner. Check the label rather than guessing by touch.
The topcoat: what to choose and how to apply it
For most exterior wood surfaces, 100% acrylic latex paint holds up well in US climates. It stays flexible, resists UV degradation better than oil-based alternatives, and cleans up with water. Benjamin Moore’s exterior lines and Sherwin-Williams’ exterior acrylics both have good records for durability; either major paint maker’s exterior line is a reasonable starting point.
Two coats is standard. The first coat penetrates and sets. The second coat covers and protects.
Apply in the right temperature range. Most exterior latex paints specify application between about 50 and 90 degrees Fahrenheit. Below 50, the paint doesn’t cure properly. Above 90 or in direct sun, it can dry too fast at the surface and not bond underneath. Morning application on a warm day, in the shade where possible, is the practical version of this.
Work top to bottom. Drips and spills run down; painting above what you’ve already done means you catch them in the next pass rather than on finished work.
The honest math
Exterior paint done with proper prep typically holds for seven to ten years on well-maintained wood in average US climates. Exterior paint skipped over bad prep can start failing in two. The labor cost between doing it right and doing it again in two years is significantly higher than the prep cost the first time.
You can make an ordinary house look considered without a designer’s budget. But the version of that on the exterior is letting the house actually hold what you put on it, which means prep is not the place to save time.